Videos & Images 1.0
The video and images tab allows you to upload an image or video to your project.
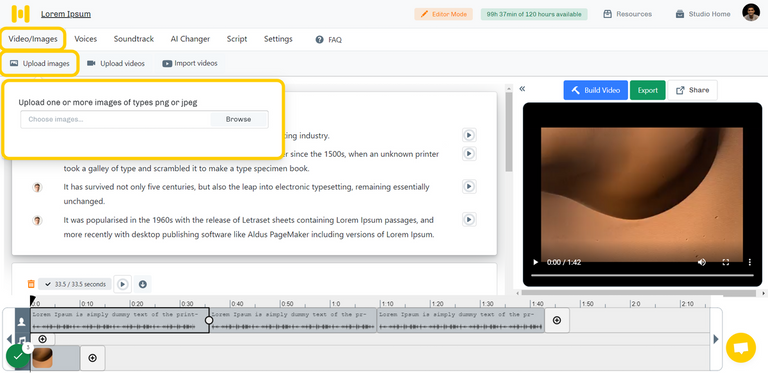
Upload Image
- The supported image formats are
- JPEG
- PNG
- Free Trial: 50MB
- Basic: 200MB
- Pro: 400MB
- Images can be uploaded form the Videos/ images tab.
- Individual and multiple images can be uploaded to the Studio.
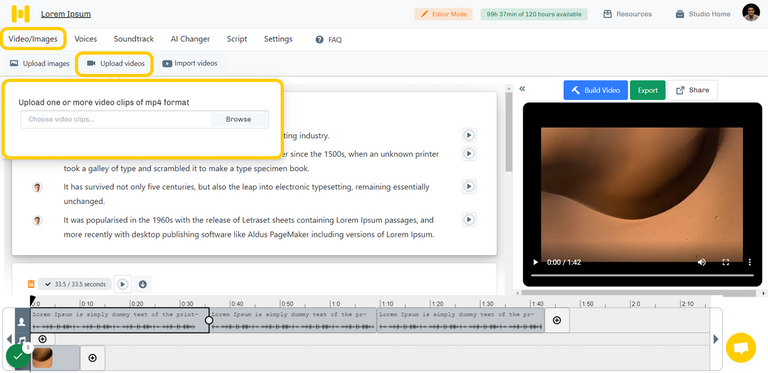
Upload Video
- The supported video formats are
- MP4
- MOV
- Upload size limits:
- Free Trial: 50MB
- Basic: 200MB
- Pro: 400MB
- By default, the Studio splits the audio and the video. It places them in their respective position on the bottom timeline.
- This allows you to trim and delete the audio and video blocks separately.
- Video's audio can also be transcribed to convert the speech to text. (Pro Feature)
Import Video
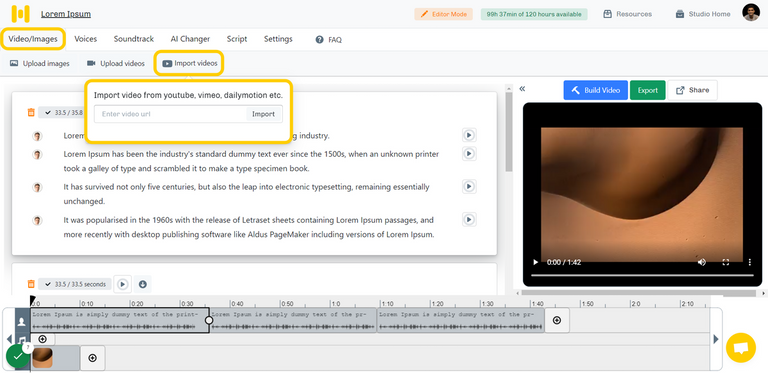
- The 'Import videos' button lets you import videos from websites like YouTube, Vimeo, Dailymotion, etc., using a link to the source video.
- Here's a list of a few popular websites which you can import a video from Youtube, Vimeo, Twitch, TikTok, Veoh, IGTV, Vevo, 9gag, Dailymotion, and many more.
Delete/Remove a video/image
You can delete/remove an image using one of the two ways mentioned below.
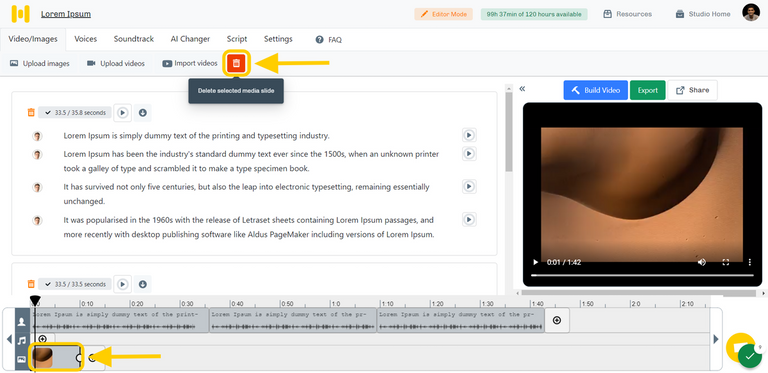
- Select the image/video you want to delete/remove from the bottom timeline and click on the orange delete button on the top menu bar under the 'Video/images' tab.
OR
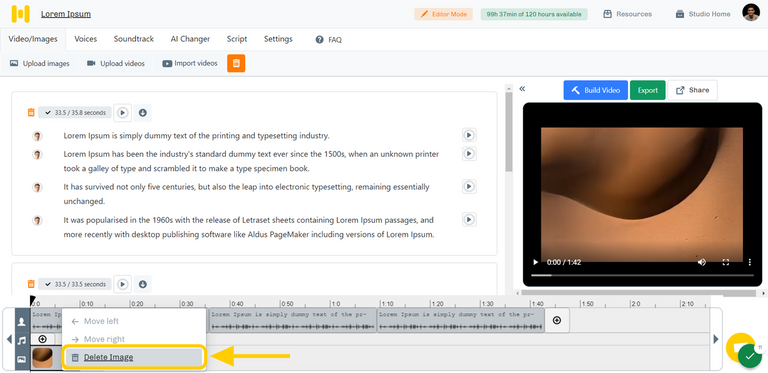
- Select the image/video you want to delete on the bottom timeline, and then right-click. You will see a 'delete' option for the selected media.
- Please note that this action cannot be undone. So make sure that you have selected the correct image/video.
Trim video
You can select an image or video that you want to trim on the bottom timeline.
- Click and drag the image/video from the right edge to the left to trim the duration of that file in the final video.
- For a video, you can trim from the left side also. The actual video clip will be trimmed when performing this action.
- You can also undo the trim for videos(Not applicable for images) by Selecting the trimmed video at the bottom of the timeline. An 'Undo trim' option will appear in the top toolbar. You can use this to undo the trim if you wish also.
Customize video sizes
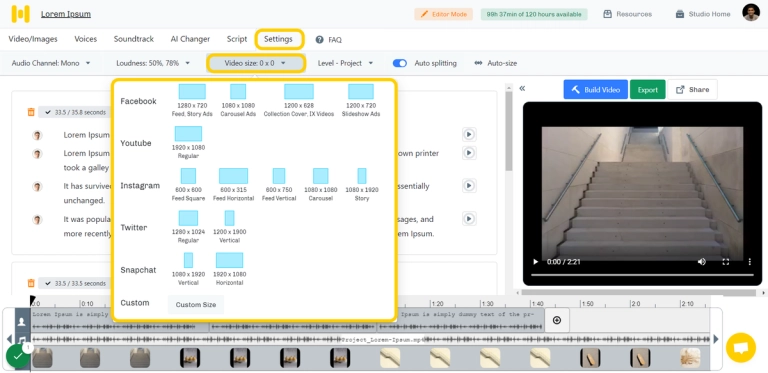
The Studio also has the option to change the aspect ratio of the video that suits the video dimensions for publishing standards of social media platforms like Facebook, Instagram, YouTube, etc.
You can choose from the pre-set ratios or you can also set a custom ratio as per your requirement. You can find this option under the "Settings" option in the Studio home.
Build Video
To view the changes made to your project, you will have to click on 'Build Video' to generate the final output.
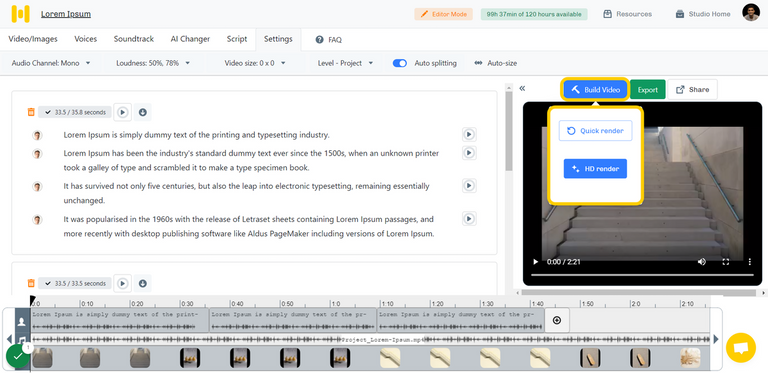
The Studio will prompt you to choose the quality you want for the video.
Quick Render: This creates a low-resolution version, best suited for quick previews of your project. This feature helps minimize rendering time so that you can take a quick preview of the video and make edits if needed.
HD Render: High-quality version of your video. It is used to download the final outcome and share the project. By default, all downloadable videos created in Murf Studio will be in HD quality.
Once you have previewed the video, select the 'Final HD render' option to obtain the video in the best possible format.
How to create a voice over video?
1. Upload Media
1.1 Upload Image
- Open the studio, and create a new project.
- Under the videos/images tab in the top toolbar, click on ‘Upload image' and upload the images from your local drive by clicking 'Browse'.
1.2 Upload Video
- Open the studio, and create a new project.
- Under the videos/images tab in the top toolbar, click on ‘Upload Video' and upload the images from your local drive by clicking 'Browse'.
1.3 Import Video
- You can also import videos from the websites mentioned above under the ‘Import video’ section.
- Click on 'Import videos', and paste the link of the video from the source website and press 'Import' and the video will be imported to the studio.
2. Add Voice over
The studio lets you add a voice over to your video. You can just type, copy/paste or import the script to be narrated and get the output as a voice over. All voice overs created using paid plans in Murf are copyright protected with commercial rights. Hence you can use them anywhere, anytime. Read more
3. Add background Music
- Upload - Murf provides an option to upload custom background music from your computer.
- Import - The studio has an import audio feature, which allows the user to import audio tracks from other websites.
- Gallery - The studio also has its own gallery of royalty-free music, which can be filtered based on their genre and use-case.
- Click here to read more about adding background music.
- Click here to read more about adding background music.
4. Syncing the voiceover to the image/video
Timing the audio to the visual is crucial for making perfect voice over videos. You can properly time the audio to the video using the following methods.
4.1 Changing the speed of the narration
Changing the speed of narration is one of the ways to time the audio to the visual. Here’s how you can do it :
- After the voice has been generated, select a text block and click on the ‘Speed’ option under the ‘Voices’ tab in the top toolbar.
- Adjust the scrollbar as per your requirement. If you want to reduce the speed, move it towards the left and vice versa.
Click here to read more about changing the speed of the narration.
4.2 Adjusting the Image/video duration
You can also adjust the timing of the audio and the video by trimming the duration of the images or videos to sync it to the length of the text block.
- Select the image/video from the bottom timeline and trim or extend the image by dragging it towards the left or right respectively. Please note that only trimming is applicable for videos, extension of clips is not possible in Murf.
- The videos can be trimmed from the left edge as well, but not the images.
5. Customize video sizes
The studio also has the option to change the aspect ratio of the video that suits the publishing standards of social media platforms like Facebook, Instagram, YouTube etc. You can choose from the preset ratios or or you can also set a custom ratio as per your requirement. You can find this option under the studio setting in the toolbar.
6. Build Video
- Once you have made all the edits, click on 'Build Video' to generate the final output.
- The studio will prompt you to choose the quality that you want for the video.
- Quick Render - This creates a low resolution version, best suited for previews. This feature helps minimize rendering time, so that you can take a quick preview of the video and make edits if needed.
- HD Render - High quality version of your video, for downloads & sharing. All downloable videos created in Murf studio, will be in HD quality by default. Once you have previewed the video, select the ‘Final HD render’ to obtain the video in HD format.
7. Download & Share
- After the final video is rendered, the download and share options will appear next to the 'Build Video' button.
- Click on 'Download' to download the video to your computer.
- Use the 'Share' feature to share the video through a link.
- Unlimited downloads are included with all paid plans in Murf. Downloads are restrictied in the free trial, but the link sharing feature can be used to share project output for review.
